
You head out in the morning to feed your flock of chickens, and your prized rooster limps over to you. Don’t despair. Numerous ailments cause a chicken to limp, and most of them are treatable. Your first task will be to determine the cause of the limp. Then you can try several treatments to try to help heal your Little General.
What makes a chicken limp? A chicken can limp from many illnesses or injuries. The most common are bacterial or viral infections, skeletal injuries, nutritional deficiencies, or severe cases of parasites.
The good news is that many of these conditions are avoidable and most treatable, especially if caught early enough. This article will expand upon each of those categories and suggest treatments for each.
Check out this article on treating the most severe chicken leg injuries: broken and torn limbs.
1. Bumblefoot: Most Common Cause of Limping Chickens
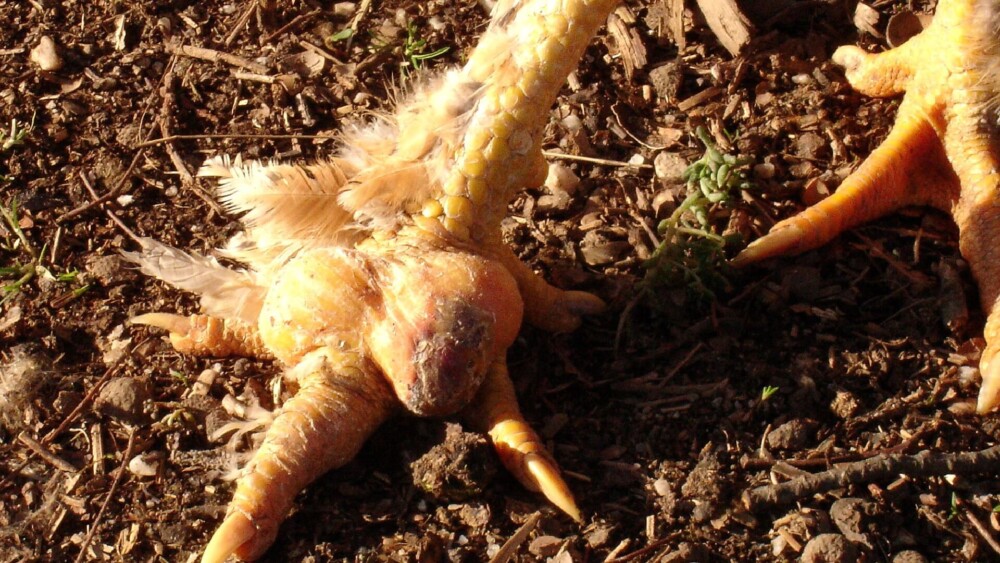
Bumblefoot is the most likely cause of a limping chicken. When one of my chickens is limping, the first thing I check for is bumblefoot. Bumblefoot is a Staphylococcus (Staph) infection that usually starts on the bottom of a chicken’s foot.
Staph bacteria are commonplace; they only become problematic if they get inside an animal’s body. When chickens hop-off high roosts, they may get a small cut on the bottom of the foot. This provides the Staph entrance into the chicken’s foot, which causes infection (More info on Bumblefoot). It will likely require treatment.
Bumblefoot is easily recognized by a small, dark scab typically found in the center pad of your chicken’s foot. If not treated, it can spread throughout its foot and into its leg.
If your chickens are not used to being handled, you’ll want to check at night so you can easily remove the limping chicken from its roost for inspection.
You can treat Bumblefoot yourself or take your chicken to a vet for help. Because Staph bacteria infect humans and chickens, please use gloves to inspect and treat your chicken’s foot for bumblefoot. Wash your clothes right afterward to ensure you don’t spread the bacteria.
Treating Bumblefoot:
This is the process that worked best for me the two times I’ve treated it.
Implements you’ll need to treat bumblefoot:
- Gloves
- Eye protection
- A tub to soak your chicken
- Epsom Salts
- Tweezers (if you use your own, you’ll need to bathe them in bleach afterward to kill the Staph)
- Something like a scalpel (disposable scalpels are inexpensive from Amazon)
- Neosporin-type ointment
- Q-tip
- Gauze
- Vet wrap
- A paper cup or something to use to dispose of the infected kernel
How to Treat Bumblefoot:
- Prepare a tub of warm water with a cup of Epsom salts. It should be deep enough to cover 1-2 inches of your chicken’s feet.
- If your chicken is not used to being handled, wrap it like a burrito in a light towel (I use cheesecloth because it’s light–then I throw it away). This keeps your chicken calm.
- Place your chicken’s feet into the warm tub of water. Be sure your bird cannot topple over and drown. Because your chicken may well sit down in the tub and get wet, this is not a suitable procedure to do outdoors in the winter.
- Soak your chicken’s feet for 20 minutes. If you (and your chicken) can stand the soaking process any longer, leave it in for up to 30 minutes.
- Exchange the towel for a dry one when you remove your chicken from its foot soak but keep the chicken wrapped snugly.
- Holding the chicken upside down on its back, pick around the edges of the scab with your scalpel-like implement. After you have loosened the scabby picking around it with your scalpel, use your tweezers to start to pull it out. You should remove something like a kernel. You SHOULD NOT need to cut into the foot of your chicken. That will be painful and risk additional infection. If you have soaked the foot long enough, the skin should be soft. After picking around it, the kernel can be tweezed out and loosened it up using the scalpel and your tweezers.
- If the kernel is still entrenched, you may need to soak the foot longer and try the above process again. I had to repeat the soaking a couple of times on one of my chickens.
- Once you have removed the scab and kernel, squeeze the pad of the foot to get out as much of the infection as you can.
- Dispense a Neosporin-type ointment onto a Q-tip, then cover the wound with it. Throw away the kernel and the Q-tip in the paper cup or similar item and dispose of it in an outside trash bin.
- Cover the wound with a thick gauze pad, use vet wrap to hold the gauze in place, and cover the foot entirely.
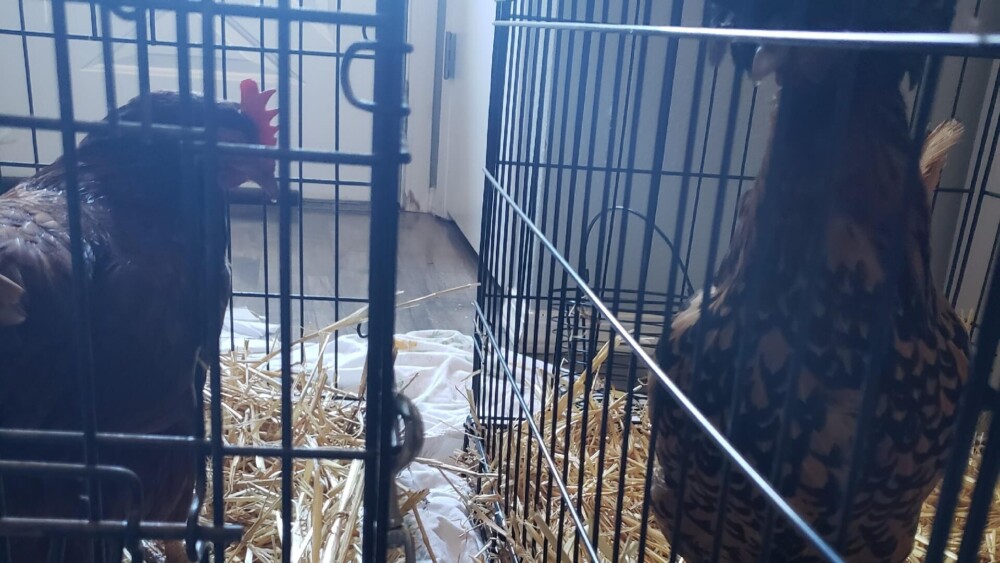
After the procedure, keep your chicken in your chicken hospital (a small cage with plenty of fresh food and water) for a couple of days. If you can set this up within sight of its friends, it will be less likely to lose its place in the pecking order.
Change the bandages after two days. If the dressing falls off, clean the wound before replacing the bandages. If done correctly, most victims of bumblefoot recover fully. But, they will be somewhat hindered until their foot has healed.
I once had a large Buff Orpington hen with bumblefoot. I removed her scab and wrapped her foot in pink vet wrap. I mistakenly left her out with her friends. That evening an enormous Great Horned Owl swooped down and chose her for dinner.
I was amazed that any bird could pick up my 6-7 pound hen and fly off with her, and I’ve always wondered how the owl dealt with the pink vet wrap and gauze!
2. Pasteurella (Fowl Cholera): Lameness From Swollen Feet and Joints
Pasteurella is a bacterial infection carried by wild birds, rodents, and cats. Its scientific name is Pasteurella multocida, also known as fowl cholera.
A chicken infected with Pasteurella will lay fewer eggs and experience delayed growth, darkened comb and wattles, and lethargy. If untreated, it could lead to swollen head, wattles, joints, and feet. Swollen footpads and joints may cause lameness.
Because Pasteurella is a bacterial infection, you can treat it with antibiotics. In addition, maintaining as clean and rodent-free an environment as possible reduces the likelihood of this disease.
The decision to treat chickens with antibiotics should not be taken lightly. I have heard some respectable breeders comment that they do not treat their flock with any medications at all. When one of their chickens is trying to die, they help in the process.
The advantage to such a breeding philosophy is that only the strongest chickens reproduce so that you will have a robust flock in the long run.
For many backyard chicken enthusiasts, their chickens are their pets. It is only natural to want to treat your pets if treatment is available. Before you dispense any medication to your chicken, be sure to check to see if there is an egg or slaughter withdrawal period. You can find a list of antibiotics approved for use in chickens here.
3. Mycoplasma Affects Legs and Feet
Two types of mycoplasma bacteria affect chickens: Mycoplasma synoviae (MS) and mycoplasma gallisepticum (MG). Often both are found in the same chicken. They are common and usually not fatal in otherwise healthy chickens.
In the early stages, MS and MG are detected by sneezing and wheezing sounds from your chickens. Both MS and MG affect the chicken’s air sacs, but MS also causes swelling of joints. This swelling can cause lameness in your chickens.
Most antibiotics attack the cell wall of bacteria, causing them to die off. Mycoplasma lack a cell wall, so they are somewhat difficult to treat with antibiotics. Still, many chicken people treat mycoplasma infections with Tylan, an antibiotic that has some success in treating MS and MG and minimizes the likelihood of secondary infections.
There is mixed information online about whether Tylan (tylosin tartrate) has been approved in the US for egg-laying hens. Some sites suggest it is approved, while others suggest it is only approved for chickens intended for slaughter, not for egg production.
You will have to make the final decision whether to give antibiotics to your chickens. But, you should probably abstain from eating the eggs of hens that are currently on antibiotics.
If you decide to administer antibiotics (or any medication) to your chickens, be sure to reveal your choice to people interested in purchasing your birds. Some people have allergies to certain antibiotics, and some medications leave trace remnants in chickens’ fat cells or eggs.
Viral Infections that Cause Lameness in Chickens
Viral infections are not affected by antibiotics, so they are harder to treat. Suppose you suspect your chicken has a viral infection (or any illness, for that matter). In that case, you should immediately put it in your chicken hospital, away from the rest of the flock, to avoid contagion.
4. Mareks: Tumors That Affect Balance
Mareks is a herpes virus that causes tumors to grow throughout your chicken. These tumors affect many organs, and in advanced cases, Mareks affects your chicken’s balance and coordination.
You will recognize the signs of Mareks quickly after you’ve seen it once. Your chicken will keep its wings tucked into its sides and lay with its legs splayed out to one side like a Z. It will look emaciated and partly paralyzed. Its eyes and foot pads may be gray.
There is no known treatment for Mareks, so if you suspect one of your chickens has it, remove it from the flock as soon as possible. Because Mareks is spread when your chickens inhale the dander from the feathers of an infected chicken, make sure you house your sick chickens as far from your flock as possible.
While there is no treatment for Mareks, there is a vaccination to protect your flock against it. If you bought your chicks from a hatchery, they are most likely vaccinated. If not, you can buy the vaccination and administer it yourself.
You can purchase it for about $30 for 1,000 doses. However, you must keep it extremely cold until used, so it requires overnight shipping if you buy it online. Mix it with a dilutant before administering. After you mix it, you shouldn’t store and reuse it. Plus, it is most effective on chicks younger than a day old.
It’s a bit of an ordeal to give shots to such tiny fluff balls. And, the vaccinated chicks should be isolated from the rest of your flock for 3-5 weeks.
If you have a chicken with Mareks, some people feel it is more humane to shorten its suffering and slaughter it. That is a personal decision, though if the disease is advanced, it usually only takes a day or two for your chicken to die on its own.
Viral Arthritis
Chickens can get arthritis from reovirus. Like many other diseases, it can spread through the flock through respiratory secretions and droppings, so removing the chicken from the flock is paramount.
Viral arthritis is more common in commercial meat breeds than layers. It leads to lameness due to swollen hocks. You will also note reduced feed consumption and weight loss in your chickens with viral arthritis.
Like Mareks, there is no treatment for viral arthritis, so the best way to avoid it is to practice suitable sanitation measures in your coops since it Mareks spread through fecal contamination.
Viral arthritis may cause your chicken to limp, but it is not likely to kill it. It may weaken its immune system and make it more susceptible to other diseases. It will also likely make your laying hens less productive.
If you suspect your chicken has viral arthritis, isolate it and provide it with warm, predator proof housing with sufficient food and water. Limit its stress as much as possible.
Skeletal Causes of Limping
If you’ve kept chickens long enough, you have experienced a chicken with a toe, leg, hip, or muscular injury that causes it to limp.
The most common skeletal abnormalities in chicks are curled toes and spraddle legs.
Curled or Crooked Toes
Curled (or crooked) toes are common in newly hatched chicks whose incubation was less than ideal due to either eggs stored too long or too cool incubation temperatures. Fortunately, curled toes are easy to treat using homemade chicken shoes for your chicks.
If treated early enough, there is a high success rate for healing your chick’s toes. I recommend gathering the necessary supplies as soon as you notice crooked toes on a newly hatched chick. Then as soon as that chick fluffs up and completely dry, put the chicken shoes on your chick.
To treat curled or crooked toes, make chicken shoes using the following supplies:
- a small piece of thin cardboard (a cereal box works well)
- a pen to outline the size of your chick’s feet on the cardboard
- scissors
- vet wrap
- a small piece of duct tape
How to treat curled toes:
- Holding a small piece of thin cardboard up to your chick’s foot, uncurl the chick’s foot and gently press its toes out flat against the cardboard to determine the size of shoe to create. Outline the shape of the chick’s foot on the cardboard. The shoe should be roughly the shape of a small slice of pizza.
- Cut out the cardboard along the lines you drew
- Hold the chick gently on your lap (you may want to wrap it in a cloth napkin to keep it still or have someone hold it for you) and flatten its foot against the cardboard. Use a small piece of vet wrap to hold it in place.
- Tape the vet wrap in place for extra security.
Keep in mind that the chick’s legs are still weak, so the lighter and smaller the shoe, the better. Try not to use thick cardboard, and use as little vet wrap as possible. Your chick should be able to walk with its shoe. Be sure it can access food, water, and its heat source.
Also, because chicks instinctually peck at everything, a chick with a shoe will be an immediate target, especially if its toes or toenails are sticking out of the shoe. So try to cover its toes and toenails with the vet wrap or tape. Otherwise, it’s likely to get pecked. And if its toes bleed from pecking, the red will attract even more pecking.
Spraddle Leg
Another common leg deformity that causes limping in newly hatched chicks is spraddle leg. Spraddle leg occurs when the tendon on the tibia (lower leg) of a chick slips off. The chick loses control of its lower leg and so spraddles flat on its stomach rather than stands.
This usually is the result of recently hatched chicks slipping on a slick incubator surface. To avoid this, I insert a couple of layers of grippy shelf liner at the bottom of my incubator during lockdown. Dollar Tree carries it, so it’s cheap. I even throw it in the washing machine after hatching. You can wash and reused it a couple of times.
There are several ways to treat spraddle leg, but they all involve bringing the chick’s legs back under its body into a normal position where it can both stand and walk.
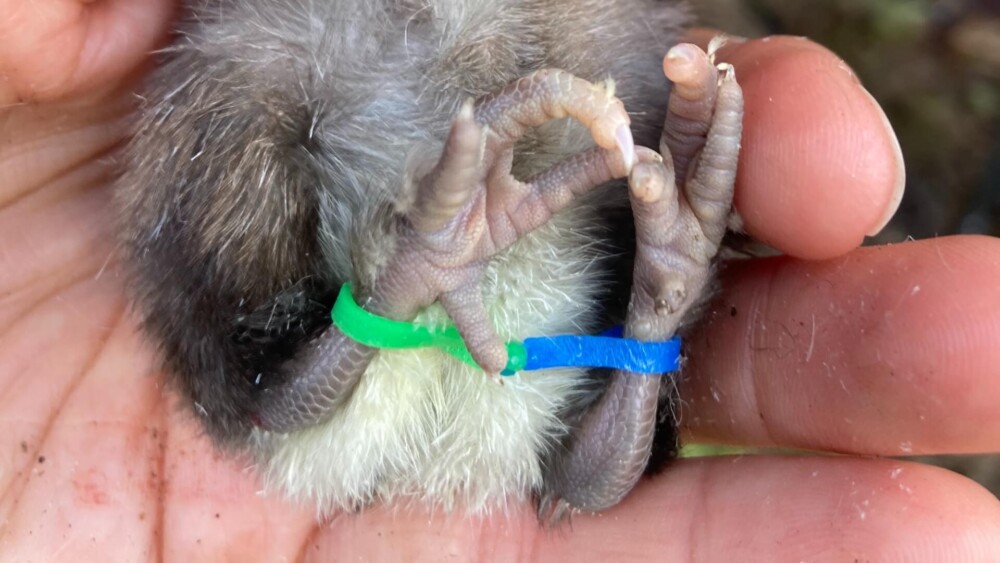
My preferred method is to use two of the tiny rubber bands that are often used to identify chicks or used for braces. I hook those together and put one of the chick’s legs in each rubber band. I then slip it up just over the chick’s hocks.
These bands should be slipped up slightly higher, just over what looks like its knees (not really their knees, but that’s for another article!).
The chick’s legs are held close together by the bands, but the bands are stretchy and loose enough to allow the chick to move its legs and walk.
Another technique is to cut bandaids into butterfly bandage shapes and attach the sticky parts to each leg of the chick. This, too, serves to hold the chick’s legs close enough together that the chick can stand but gives it enough room to walk around as well.
There are other techniques to treat spraddle leg as well. Whatever method you decide upon, treat the chick as soon as you notice the slipped tendon, and leave it on for at least three days. Most of the chicks I’ve treated have had complete recovery within just a couple of days.
Other Bone Deformities
There are several different bone deformities that might cause lameness in a chicken, but they are more likely to be found in production meat birds. These include kinky-back, twisted legs, and osteochondrosis.
If you are raising fast-growing meat birds, you may want to look into these deformities as possible causes for limping, but this article will not discuss them in detail because they affect mostly large-scale production birds.
Broken Bones
Like most birds, a chicken’s legs are composed of thin, hollow bones, and some chickens seem accident-prone. Don’t be surprised if one of your chickens breaks its legs. Fortunately, bones heal naturally, so your task is to provide it the opportunity to heal correctly.
I once found one of my chickens hanging upside down in its coop. Its toe had caught between the 2×4 we used as a perch and the rabbit wire on the side of its coop. Poor Henasthesia might have squawked when she was first stuck, but she was silent and still, hanging by one toe when I found her. Poor bird! Yet only a few days later, you’d never know she was injured.
As long as your bird’s bones have not broken the skin and the break is along its shank, you may want to try to treat your chicken’s broken leg yourself. There are many how-to articles and videos to guide you. Breaks in the shank (between the hock joint at the top of the leg where it bends and the toes) are the easiest to DIY set. Here’s one technique.
You will need the following items to set a broken shank bone in your chicken:
- One or two popsicle sticks or tongue depressors
- Vet wrap
- Masking Tape
- Cheesecloth or light towel to wrap your chicken
How to Treat a Broken Bone:
- If your chicken is not used to being held, wrap it like a burrito in cheesecloth or a light towel.
- Measure the popsicle sticks or tongue depressor (for larger chickens) and cut them to the size of your chicken’s shank.
- Wrap the sticks in vet wrap or masking tape to ensure there are no sharp edges on the sticks that could cut into your chicken’s legs.
- Splint the fracture with sticks on either side of the broken leg.
- Hold the sticks in place and use vet wrap to wrap lightly but firmly enough to stay in place.
- Use masking tape over the vet wrap for another layer of protection and ensure the split doesn’t fall off.
As with the other ailments we’ve discussed, place your chicken in a chicken hospital for a week at least and up to 3 weeks. If possible, keep it within sight of its friends, so its pecking order isn’t severely affected. Provide plenty of fresh feed and water to aid in healing. It’s ready to be reintroduced to the flock when its limping is negligible.
Dislocated Bones
Two of my nearly full-grown roosters have dislocated a hip in the six years I’ve kept chickens. One was a majestic Buff Orpington rooster, and one was a Black Copper Marans (BCM).
I asked my chicken friends for advice, and most said to bring them to a vet if I was willing to pay the $200+ bill I would likely end up with. If not, they suggested I put them in a chicken hospital and leave the bones to heal themselves.
Living on a budget, I chose the latter option. My Buff Orpington died a couple of days after I noticed his limp; however, my BCM healed fully. It took over a month to walk steadily, but he matured into a beefy fellow. Today no one could guess he dislocated his hip as a youngster.
My online research suggested that I wrap the injury around his leg and under the opposite wing to stabilize it. I tried that with disastrous results. It left my BCM off balance and hobbling considerably more than his dislocation. So I removed the wrap and left him to heal in a small cage with fresh water and feed.
Nutritional Deficiencies that Cause Limping
If you examine your limping chicken and find no swollen or broken bones, no evidence of bumblefoot or disease, your chicken may be suffering from a nutritional deficiency.
Thiamine or Vitamin B1 is essential to your chicken’s diet. Fortunately, most balanced feeds provide sufficient B1 for your chicken’s needs. However, some medications commonly given to chickens (especially when chicks) are thiamine uptake blockers, which may lead to a thiamine deficiency over time.
Corid, one such medication that can save your flock from coccidiosis, can also damage your birds if given for too long. The symptoms of a thiamine deficiency in chicks are the following:
- Ataxia (loss of muscle control and balance)
- Tremors
- Paralysis of muscles starting with the toes
- Chicks sitting back on legs with necks craned backward, called stargazing
- Inability to stand upright
The symptoms in adult birds include the above and these as well:
- Lethargy
- Weakness
- Loss of appetite
- Impaired digestion
- Emaciation
- Convulsions
- Loss of embryos of incubated eggs or signs of thiamine deficiency in hatched chicks
Chickens treated immediately usually recuperate. The key is to treat early. Use B1 vitamin drops (1-2 mg per kg) and add the following foods to your sick chicken’s diet: Brewer’s yeast, rice bran type cereals, soybean meal, wheat germ, cottonseed meal, flaxseed, eggs, and greens. Chicken vitamins (i.e., Rooster Booster and Nutri Drench) also contain B1.
As usual, put your chicken in the chicken hospital to give it a quiet, peaceful place to recuperate. Be sure it has sufficient drinking water and feed supplemented with Thiamine.
To avoid Thiamine deficiencies, feed your chickens a well-balanced chicken feed and do not overfeed table scraps. In addition, if your flock requires a thiamine uptake blocker to treat for coccidiosis, provide high thiamine supplements after treatment to replenish their Thiamine stores.
Vitamin D3 supports bone growth in chickens as well as humans. Chicks who lack this vitamin will develop soft bones and rickets, which will result in limping. If not treated, your chickens will develop osteoporosis, and their egg production will be reduced as adults.
The best way to avoid this is to use a well-balanced chicken feed and provide table scraps sparingly, as with all nutritional deficiencies.
If you suspect a vitamin D3 deficiency in your chicks, provide it with chicken vitamins (Rooster Booster or Nutri Drench) and foods high in D3, such as mushrooms, cooked eggs, and fish.
While other nutritional deficiencies could cause limping in chickens, those are the primary culprits. They are all avoided by providing the proper nutrition for your flock.
Parasites
Some parasites can cause a chicken to limp. Parasites can be found internally and externally on your chicken. Internal parasites are unlikely to cause a chicken to limp (though an extreme case could kill it), but external parasites may cause leg problems.
Scaly leg mites (knemidocoptes) burrow beneath the scales on your chicken’s feet and legs and create microscopic tunnels as they dine on your chicken’s leg tissue. If untreated, your chicken’s feet and legs will develop thick, crusty scales, lameness, and it may lose a toe. This can undoubtedly cause limping.
Long before your chicken limps from scaly leg mites, though, you should recognize the problem and treat it. If your chicken has thickened, lumpy, discolored skin on its legs or feet, it’s time to treat for mites.
If you find one infected chicken, you may want to treat the entire flock and clean the whole coop as with any external parasite. You can be sure that other birds in your flock are infested as well. Scaly leg mites are exceptionally infectious and likely to spread quickly.
Treat scaly leg mites:
The Natural Remedy
- Petroleum jelly
- Oil (baby oil, olive oil, linseed oil, mineral oil)
- Warm tub of water
- Light towel or cheesecloth
- Soft bristle brush
OR
Using pharmaceuticals
- Ivermectin
Every vet site I perused suggested the most effective treatment of scaly leg mite is Ivermectin. Many chicken keepers, including me, use Ivermectin to deworm their flock at times. Interestingly, since the Covid outbreak, I have not been able to find Ivermectin available to treat my chickens.
Because Ivermectin seems challenging to acquire at the moment, I’ll explain the natural remedy to treat scaly leg mites as well.
To treat scaly leg mites:
- Prepare a tub of warm water to soak your chicken’s feet.
- If your chicken is not used to being held, wrap it like a burrito in a light towel or cheesecloth to secure its wings.
- Soak your chicken’s feet for 15 to 20 minutes.
- Gently use the soft bristle brush on your chicken’s legs and feet to defoliate the skin. Do not break the skin, as that can cause infection.
- Apply the oil to the legs and feet.
- Cover the oil with petroleum jelly.
- Reapply petroleum jelly daily for up to a month.
- Repeat the entire process after two weeks.
This treatment works by suffocating the mites. But as you can see, it is time-consuming. Some sites suggest dipping your chicken’s legs in gasoline first and then applying the petroleum jelly. Most vets’ pages warned against such treatment as being dangerous for all involved.
Frostbite
If you live anywhere, it freezes, frostbite is a big threat. It is a common disorder in freezing areas that can cause limping and even the loss of toes or limbs due to infection.
There are many in-depth articles about frostbite, but in brief, to avoid frostbite, you should maintain a dry coop for your birds, provide a wide roost bar (so they can sit on their feet and keep them covered), and maintain a thick layer of bedding in your coop and run.
Monitor your birds during freezes. Their combs and wattles usually experience frostbite before their feet. If you notice any whitening or swelling of combs, remove your chicken to a warm area and treat immediately. You may avoid its feet becoming frostbitten, which is more dangerous for the bird than frostbite in its comb or wattles.
If its feet do become frostbitten, rewarm the frozen feet in warm water (some people suggest adding Epsom salt). Once the feet are warm, wrap them gently in gauze or vet wrap. Wrap each affected toe individually. Place your foot-wrapped chicken in a chicken hospital, which should be in a warm spot and have soft bedding (towels work well).
Depending on the severity of the frostbite, you may need to soak every couple of days for a week or so. It takes two to three weeks to heal. If your chicken’s feet become infected, you may need to treat it with an antibiotic. In the worst cases, your chicken’s toes or feet may fall off. But if you can avoid infection, even a one-footed chicken can live a full life.
Conclusion
As you can see, there are numerous possible causes for your chicken’s limp. Do not despair if you notice a limp, but act as soon as possible to determine the cause and treat it. Your chicken will appreciate it and, if it’s a hen, will provide you with abundant globes of thanks.
My Favorite Chicken and Duck Supplies
This list contains affiliate products. Affiliate products do not cost more but helps to support BestFarmAnimals and our goal to provide farm animal owners with accurate and helpful information.
Manna Pro Oyster Shell keeps eggs strong. Before I gave my chickens oyster shell, I had the oddest eggs, many with weak and irregular shells. Now, I don’t have an issue.
Layer Feed by Manna Pro. I like pellets rather than crumbles as my chickens eat them better and less gets wasted or scavenged by rodents. A good layer feed makes the difference in hens laying many more eggs.
My chickens love this mealworm treat, which gives added protein, something that’s great during molting and winter months.
There are many ways to feed and water your chickens. I like this food and water setup the best because it reduces waste, saves me time feeding and watering, and keeps the food fresh longer. Except, in the winter, I use a heated waterer. The only problem is the heated waterers need to be replaced every few years.
I love this chicken veggie hanger. It makes it easy to give your chickens produce from the garden and keep them occupied in the winter with a fresh head of lettuce.
These chicken toys are a hoot! They will help curb bullying and keep your chickens active, especially in the winter when hens tend to get more lethargic.